Disclosure: Some of the links below are affiliate links, meaning, at no additional cost to you, I will earn a commission if you click through and make a purchase. It’s not nearly enough to pay for my rent, but hopefully you can help support my coffee addiction. 🙂
As we enter into a new normal of jumping on daily zoom calls, learning work from home etiquette, or attending regular video interviews, I wanted to provide my best tips on creating a professional, polished background for video calls. Included in this post are some best practices for your background decor and appearance as well as tech accessories to increase the quality of your setup. Feel free to read along or watch the video below for a more in-depth tech setup walk-through.
How to Create a Professional Background for Video Interviews
I remember the first time I conducted a video interview with a candidate. I was so distracted by the clutter in their living room it was hard to pay attention to what they were saying. Is that a leftover pizza box sitting on their couch? Who is that person walking back and forth behind them?
I can also vividly remember the first time a client asked if they could chat with me via video instead of our regular audio. While I had a blank wall towards my back, the lighting was awful and, as strange as this sounds, I didn’t feel as confident. Maybe not so strange… after all, we often feel more confident when we look and feel our best.
Fast forward to today, I’m often asked in my group coaching calls, “How does your place look so organized and bright?”
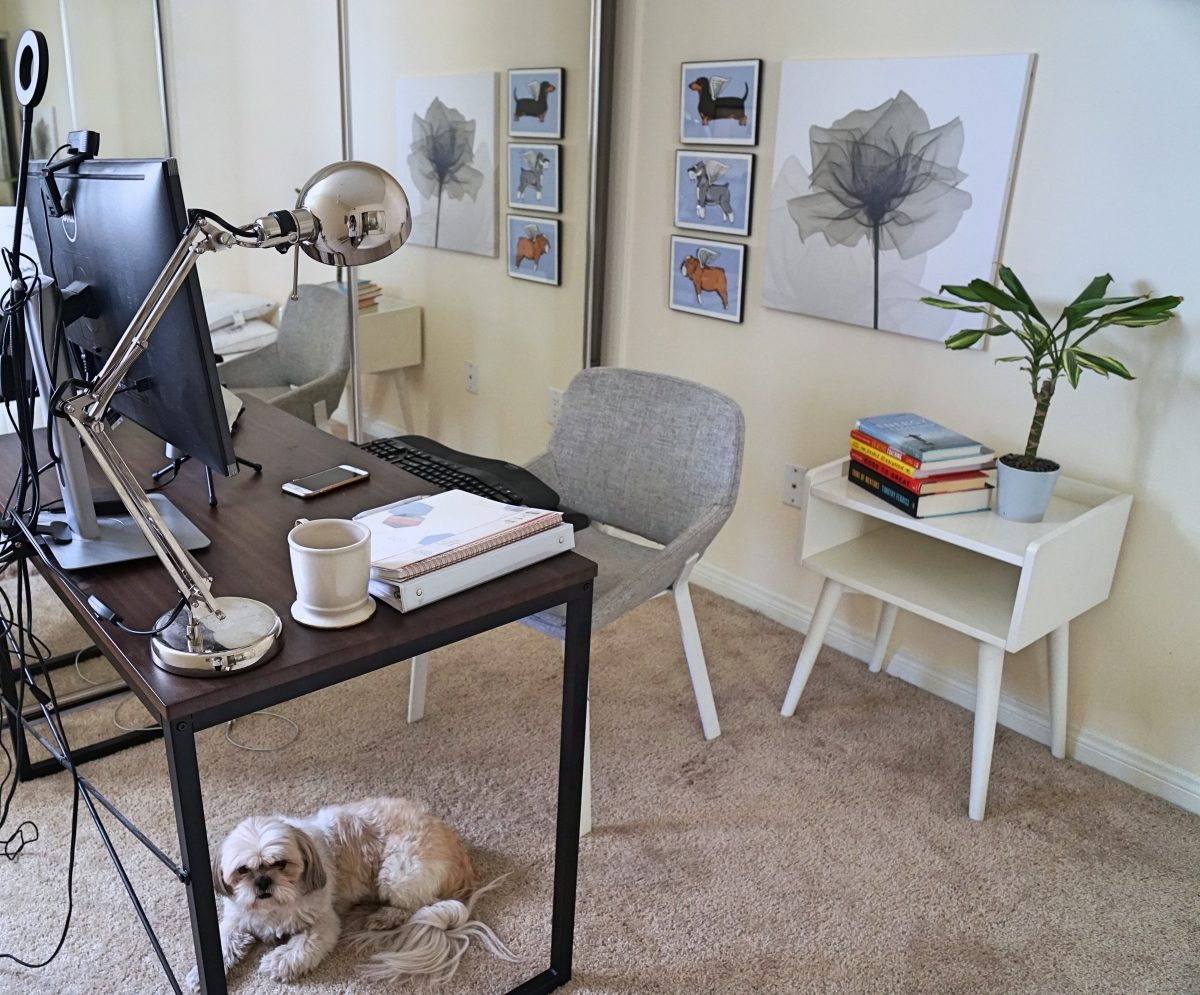
Don’t mind my dog or all of the wires sticking out… this is a behind the scenes look!
Well, friends, today I’m going to let you peek into my home setup because my video background didn’t always look this neat. And the rest of my house, truth be told, isn’t always so neatly organized… it really depends on the day or the week!
I was tired of having to tidy up and organize in anticipation of every call, so I decided to just create a better, more permanent video environment once and for all. I Googled and scoured the internet for some tips but, to my dismay, realized there wasn’t much out there on the behind-the-scenes. So, I decided a few weekends ago to channel my interior design skills and created this look for under $99.
But before we dive in, let’s chat about why it’s so important to have a professional background especially if you’re interviewing with a new employer or even having internal calls with existing colleagues that already know you well.
Why is the Video Background Important on Video Interviews or Conference Calls?
Your environment can tell a lot about you as a person. I remember at my last company, there was a lady who had cats ALL over her cube. She had a cat calendar, a cat mouse, photos of her cats… it was clear that she was a crazy cat lady and really passionate about the animal. Another co-worker always had paper scattered everywhere and loose documents thumbtacked to their wall. It was a real eye sore. He was always rushing into meetings 5-10 minutes after they started apologizing for being late.
The point is, you can learn a lot about someone by how they show up in their daily environment.
When you have a video interview or a conference call in the corporate office or in a cafe, you don’t ever really need to worry about your background because people expect your environment. They can detect it looks like a normal conference room, a typical office, a monitor farm, or a Starbucks.

But when you are conducting a video interview from home, or remotely plugging into a conference call, or hosting a webinar… people can’t help but notice your background and the environment you are in. Is there a dog roaming in the background? Is their bed made? What’s on their coffee table? Are those toys scattered all over the floor?
People naturally take notice because the environment stands out as much as the main focal point of the person on camera. And because first impressions are so important, it’s critical to set up an environment that reflects your personal brand and how you want to be perceived.
Do you want to be known as messy or disorganized? Then start a video call with a pizza box on your couch. Do you want to be seen as a sports fanatic? Then have NFL posters or ESPN magazine spines stacked up behind you. Do you want to be known as crazy cat lady? Then have all 10 cats roaming on your desk and perched on the bookcase behind you.
But if you want to be seen as professional or polished, read on. 🙂
The Old Setup
For the longest time, I had my desk up against a wall because I liked being near the window. Because of this, I had a lot of room behind me and whenever I jumped on webcam, viewers could see a portion of my guest bed since I was set up in our guest bedroom at the time (awkward!).
Because of this, I usually took my video calls from my living room, but often times our living room would be a bit cluttered and I risked the chance of my dog barking when people walked past the front door. In short, my set up and the layout of my rooms was not conducive to being an online entrepreneur.
The New Setup
Instead of having my desk directly up against a wall, I decided to just push my desk to the middle of the room so that a wall was directly behind me. This removed the need to clean up every time I had a video call set up (my partner is probably now bummed because the living room is not as pristine as it should be!).
I turned on my webcam to see what part of my wall was visible and started to decorate within that area. Now, the fun part… decorate!
I filled the space with a Mid-Century style white side table from West Elm.
Similar: West Elm Mid-Century Style Nightstand -White
And to give a bit of texture, I decorated it with a bamboo plant I picked up from my local Home Depot (perfect if you don’t have a green thumb – I haven’t watered it in weeks and it’s still lush) along with some of my favorite books and books I’m currently reading. You can place anything on here that you want, just be sure it gives color, is neat and organized, and gives your viewer a glimpse into your personal brand.

Next up is filling in the rest of the white space on the wall. I actually had three photos I never framed so I went to Michael’s and used their 40% off coupon they always have and picked up a set of 8×10 frames in black.
I originally was going to hang up a large poster of a world map but the monitor kept reflecting against the glass. Because of the monitor and any lights, it’s best to have a non-glass decorative piece such as a canvas painting or 3-D wall art. I opted for the canvas route as I found this beautiful watercolor painting on Amazon that reminded me of my brand since it’s green and of nature. It was the perfect measurement (24×24) and only $30!
Other Wall Art Inspiration
Art and decorating is subjective, so put up what inspires you or reflects the best version of yourself. Most importantly, have fun with this process! I’m now living in an apartment with limited wall space, so I’ve migrated my desk setup to a spot in front of our floor-to-ceiling window. This provides for a great view of Downtown Los Angeles behind me, but also makes it absolutely necessary for me to have additional lighting in my setup. More on that below!
Let’s Talk About Tech Setup
While you can decorate and keep your budget under $100, you may need to invest a little bit more to amp up your professional lighting, audio, and video quality. You don’t need to drop hundreds of dollars though, my current setup is less than $150.
Video Setup
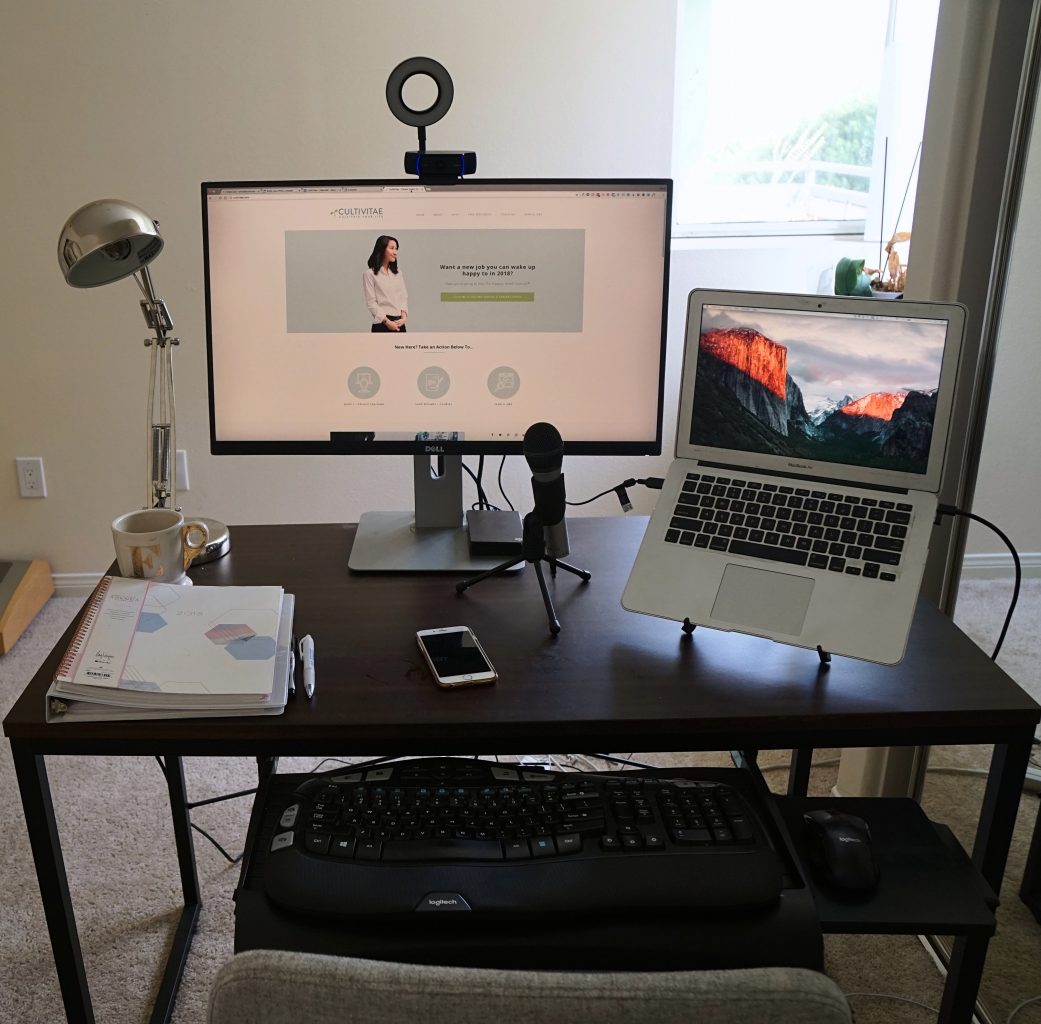
I paid $60 for the LogiTech HD Pro Webcam C920 Widescreen 1080p. Through plugging into the USB port on your computer, the clarity of the camera compared to my built-in webcam quality is crisp and clear. It’s easy to tilt and zoom so you share as much as you would like with your viewers.
I’ve used the camera on Skype, Zoom, Google Hangouts… it’s really easy to set up and detect. It apparently also has two microphones on each side of the camera to filter out background noise but since I use the microphone mentioned down below I actually haven’t been able to test out the quality.
Audio Setup
For more professional sounding audio instead of the built-in microphone from the Apple MacBook Air, I bought this Audio-Technica ATR2100-USB Cardioid Dynamic USB Microphone for $64.
Its simple to use and is really ideal for podcasting, voiceovers, or any type of conversation you’re having through the computer as it reduces pickup from unwanted sounds from the sides and rear. People always comment that I always sound so clear on my calls.
Lighting Setup
If you’re lucky to be close to a window for natural lighting, then you can probably skip this step, unless you take a lot of calls after the sun goes down. Professional photographers will tell you lighting is everything and it works magic for those who want a more flawless look. Like I said earlier, I’m set up right in front of a window, so I heavily rely on my trusty ring light to make sure my face remains well-lit despite the majority of light filtering in from behind me.
While the LogiTech C920 webcam I use apparently also has automatic light correction, I love this ring light. I only really turn it on at night when the sun goes down but if you wanted to you could use it anytime as the different levels of yellow and white light are more flattering. Nothing beats natural light though!
While it’s meant to be used when recording or streaming from a smart phone, I just clamp it to my desk so it’s directly behind my webcam’s lens. With 3 different LED light colors and 10 adjustable brightness levels to choose from, it really provides no reason to look unflattering in your videos.
Another plus is it’s USB powered so you don’t have to worry about batteries running out. I have it hooked up directly to my monitor’s USB and I’m covered for all lighting situations. Speaking of USB, you might need to pick up a USB port like this Anker 4-Port option on Amazon to ensure you have all the ports you need to create this home setup.
I also highly recommend investing in a laptop stand like this one to make sure your laptop is positioned in the most flattering way. You’ll look drastically more poised and professional with your computer angled and positioned higher up, and although you can get by with stacking books and propping up your laptop, it’s worth the small investment (this stand is less than $15!) to know you’ll always be ready to go.
What Does Your Video Background Look Like?
I hope you found these behind-the-scenes tips helpful and are already visualizing how you want to set up your home office studio. Do you have any styling or product recommendations for your set up? I would love to hear any tips on how you make your space look more professional!
Join the FREE online training to discover how to:
BECOME THE TOP 1% OF JOBSEEKERS
AND LAND YOUR DREAM JOB THIS QUARTER!


")


Wow! Lots of great tips. Thanks for sharing! I am just starting to branch out into shooting videos – mostly hair tutorials. This is really helpful!
Oh that’s so great! I imagine you can do that with a fun backdrop or colorful wall!
Ahhh what a cute idea! I take video calls from home all the time. Good to think of!
That is really helpful and informative to actually be able to see the setup! Thanks for showing the behind-the-scenes setup for all of us who appreciate visuals 🙂 It does look really clean and profesh!
I’m glad you enjoyed the visuals and glad to hear it looks profesh! 🙂
Great tips! I have long been planning to start vlogging but a decent background and proper indoor lighting are just some of my major setbacks.
The ring light and a fabric or backdrop can easily solve that! 🙂
There are some great tips here, thank you for sharing I will be taking some on board! Your set up looks incredible 🙂
Thanks, Elizabeth! That means a lot coming from you! 🙂
I absolutely adore the backdrop that you’ve set up here! I’m moving int he next few weeks and I’ve been thinking a lot about how I’m going to set up my office space, as well (for the purpose of videoing). This is perfect! Thank you 🙂
You’re so welcome, Emily! Good luck on the move!
I agree this looks really clean and professional. I like the setup of your desk space and the stand for your laptop.
Ohhh that laptop stand is crucial! I forgot to mention that. My ergonomics used to be REALLY bad!
Lots of great information here! Your space looks great! I love the decor as well. I am going to use these tips when I set up my space. 🙂